Project Building
The following table shows the necessary steps that user should follow to create SimSANs project files for VC6/VC7 and GCC3.x environments. SimSANs requires IDE for VC6/VC7 and Makefile for GCC3.x. You can also work on VC command line environment. Please refer to OMNeT++ about how to create a VC makefile.
The basic idea for project building is to create the project file by modifying existing template (say, OMNeT++ samples) instead of building a new one from scratch. I feel generating project from existing samples is fast and error proof because the samples must run fine in the OMNeT++ customized for your system. Here for example I choose dyna (located at $OMNETPP_ROOT/samples/dyna) as the project template and SimSANs_V2 as our target project name, and $OMNETPP_ROOT is assumed to be C:\OPP23 for Windows and /usr/local/omnetpp-2.3 for Linux/Cygwin. Note if you happen to have both VC6 and VC7 installed on your PC you have to use their own dyna as the template, i.e., dyna/VC6 for SimSANs_V2/VC6 and dyna/VC7 for SimSANs_V2/VC7. Besides, do not switch Makefiles between Unix platforms, i.e., you'd better use dyna/Linux for SimSANs_V2/Linux and dyna/Cygwin for SimSANs_V2/Cygwin.
How to build SimSANs project
|
C++ Environment |
Steps to Follow |
Comments |
|
VC6 (WinXP/2K)
|
Step 1. Copy and Rename Template 1.1 C:\>cd .\OPP23\samples\dyna 1.2 C:\OPP23\samples\dyna>copy dyna.dsp SimSANs_V2.dsp 1.3 C:\OPP23\samples\dyna>copy dyna.dsw SimSANs_V2.dsw
Step 2. Modify Template 2.1 Use a text editor to open SimSANs_V2.dsp and SimSANs_V2.dsw, and replace all dyna with SimSANs_V2.
Step 3. Create SimSANs Project 3.1 Download and uncompress the SimSANs library package into, say, E:\SimSANs_V2 3.2 Copy the modified SimSANs_V2.dsw and SimSANs_V2.dsp into E:\SimSANs_V2
Step 4. Add Libraries and Complete Project Building 4.1 Double-click SimsANs_V2.dsw and launch the project 4.2 Remove any other items and leave only SimSANs_V2.ned and SimSANs_V2_n.cpp in the project 4.3 (Optional) Create library folder within the project window, say, SimSANs_LIBs 4.4 Add in all 47 libraries from E:\SimSANs_V2\SimSANs_LIBs, then choose the active build, say, Release Tkenv, and build it
You are done! |
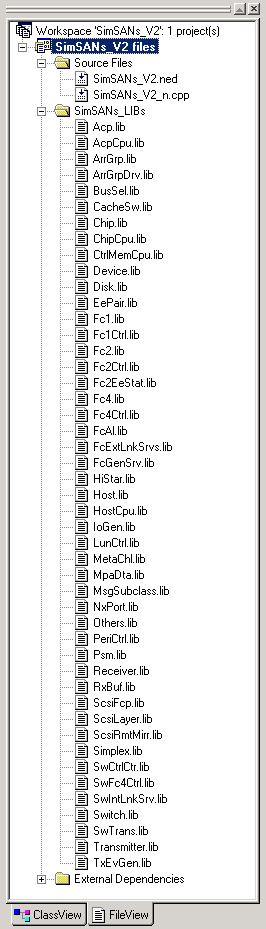
The snapshot of a sample SimSANs project for VC6 is given in Figure 1. |
|
VC7 (WinXP/2K) |
Step 1. Copy and Rename Template 1.1 C:\>cd .\OPP23\samples\dyna 1.2 C:\OPP23\samples\dyna>copy dyna.dsp SimSANs_V2.dsp 1.3 C:\OPP23\samples\dyna>copy dyna.dsw SimSANs_V2.dsw
Step 2. Modify Template 2.1 Use a text editor to open SimSANs_V2.dsp and SimSANs_V2.dsw, and replace all dyna with SimSANs_V2.
Step 3. Create SimSANs Project 3.1 Download and uncompress the SimSANs library package into, say, E:\SimSANs_V2 3.2 Copy the modified SimSANs_V2.dsw and SimSANs_V2.dsp into E:\SimSANs_V2
Step 4. Add Libraries and Complete Project Building 4.1 Double-click SimsANs_V2.dsw and launch the project 4.2 A message box popped up asking you whether convert the project to VC7 format, answer yes 4.3 Remove any other items and leave only SimSANs_V2.ned and SimSANs_V2_n.cpp in the project 4.4 (Optional) Create library folder within the project window, say, SimSANs_LIBs 4.5 Add in all 47 libraries from E:\SimSANs_V2\SimSANs_LIBs, then choose the active build, say, Release Tkenv, and build it
You are done! |
In Step 4.2 once the project is launched and user choose "yes" to convert the project, VC7 project files (.vcproj, .sln, and . suo) are generated, and the old .dsp and .dsw files are useless.
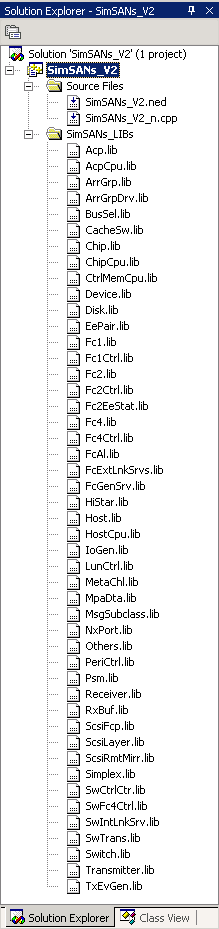
The snapshot of a sample SimSANs project for VC7 is given in Figure 2.
|
|
GCC 3.x (Linux 9.0 and Cygwin 1.3.22) |
Step 1. Uncompress SimSANs Library Package 1.1 Download and uncompress the SimSANs library package into, say, /usr/local/SimSANs_V2
Step 2. Copy Makefile Template 2.1 #cd /usr/local/omnetpp-2.3/samples/dyna 2.2 #cp Makefile /usr/local/SimSANs_V2
Step 3. Modify Template and Link Libraries 3.1 Use a text editor to open Makefile and do the following modifications: 3.1.1 replace all dyna to SimSANs_V2 3.1.2 add SIMSANS_LIBS variable like this: SIMSANS_LIBS=-L./SimSANs_LIBs -lAcp -lArrGrp -lChip -lDevice -lFc1 -lFc2 -lFc4 -lHiStar -lHost -lMpaDta -lNxPort -lSwitch -lOthers -lMsgSubc -lFc1Ctrl -lPsm -lRx -lRxBuf -lTx -lTxEvGen -lEePair -lFc2Ctrl -lFc4Ctrl -lFcEls -lFcGs -lFcp -lSwFc4Ctrl -lSwIls -lHostCpu -lPeriCtrl -lIoGen -lScsi -lChipCpu -lScsiRmt -lCsw -lCtrlMemCpu -lLunCtrl -lSimplex -lAcpCpu -lArrGrpDrv -lDisk -lFcAl -lBusSel -lMetaChl -lSwCtrlCtr -lSwTrans -lEeStat 3.1.3 replace OBJS with the following: OBJS= SimSANs_V2_n.o 3.1.4 link SimSANs libraries like this:
$(TARGET): $(OBJS)
$(EXRA_OBJS) Makefile Step 4. Complete Project Building 4.1 (Optional) Remove all items belong to the original dyna project 4.2 Choose user interface, say, USERIF_LIBS=$(TKENV_LIBS), and type #make
You are done! |
A sample Makefile is included in the library package and usually should work fine without further modifications. |
This page was last updated 2003.10.15